Personal Militaria |
These are some of my favorite items and they are shown here only for the people who know that they, themselves are just a small part of the universe and everything that has ever happened or will happen is not really about them. We each see these items and have an opinion; unfortunately, there are too many people reinventing history to their ignorant preferences of what should have happened and why. Image 1. Yes, I know what each item is and from where it came.
|
Image 2. Besides a large collection of Soviet medals from WWII, at left, there is at top, an American-made WWII Soviet tank transceiver and next to that is a transmitter from a German He-111 bomber. Marvelous things are in this image that only I know about. For instance, see the little red leatherette box at far right? During the early years of WWII (before we were in it) the British citizens were issued gas masks. These citizens were being bombed routinely night and day. Each mask was in a little cardboard box with a string to it so it could be carried over the shoulder or around the neck anytime the owner was outside. All school children had to have them, as well. Some dignitaries had small fabric bags for theirs. Mine, I bought in Hastings, East Sussex, England. This is on the English Channel just 50 miles from France, which in the early years of the war, was occupied by Germany. The German bombers stationed there were only 30 minutes from Hastings. And my little gas mask? Some person had a commercial red leatherette cover well-fitted over the cardboard box. The box string is coiled under the box and a leather strap is on the leatherette cover. The mask has two filters on it. The second was taped over the first and is held in place with tape. A British friend of mine remembers when he was in grade school and the officials were going to all the schools in Britain and each child had to stand in line and surrender his mask and while he stood there, the additional filter was taped in place and the mask was inspected for wear or damage. Inside the cardboard lid is -- "PACKING OF RESPIRATOR. The Respirator should be placed in box with heavy end (container) standing on bottom of box. The transparent eyepiece should lie evenly on the top of the container and at full length without any deformation. WHEN RESPIRATOR IS REQUIRED FOR USE. 1. Hold Respirator by the straps. 2. Put on by first putting chin into the facepiece and them draw the straps over the head. Adjust the straps to obtain close but comfortable fit. 3. Take off by pulling the straps over the head from the back. DO NOT TAKE RESPIRATOR OFF BY PULLING THE CONTAINER UPWARDS OVER THE FACE." I have often wondered how many times the owner of my mask, Miss C. E. Bovington, tried on our mask. Her name is hand-lettered in ink on the inside leatherette cover. The leather strap on the leatherette portion was buckled at the longest length and was never changed. There is the most wear at the apex of the strap which indicates that it was worn a lot over a shoulder. The most wear of the cover was on the outside corners where they would rub against things being passed or even the wearer's arms. The bottom shows almost no wear which indicates it was not routinely put down on anything rough. I will go ahead and say it: "I wonder who she was and what became of her?" This is the common wonderment of any passionate collector. |
Image 3. Interesting collection of headgear. From far right is current Soviet winter issue and Chinese cap; East German helmet (like new <G>) ; WWII Italian helmet; Libyan French cap; French Foreign Legion cap; Soviet whole head gas mask and head gear. |
Image 4. To far right is Soviet whole head tanker gear; then WWI French helmet and gas mask; brand new WWII American helmet and liner -- (This helmet was in S.F., CA in crate at a dockside warehouse to be assigned to Americans in the landing of the Japan mainland [the atomic bombs saved so many peoples' lives!); WWII British Tommy helmet with net; WWII German paratrooper helmet. Red images on wall are direct copies I made of actual WWII posters.
|
Image 5. On right is German paratrooper helmet; then late WWII German helmet; early in WWII German helmet with campaign paint; WWI German helmet with trench art; WWII French helmet; WWI French one-piece helmet with commemorative visor plate; early WWI French four-piece helmet. I have only one over-paint helmet; The WWI French with brass visor plate is the only over-paint helmet I have. I have it because it is so unique. |
I got my Glim light new, wrapped in cosmoline paper in a cardboard box. I have no idea how long it had been there. Certainly since early- to mid-WWII. They were self-contained with their small battery and bulb, and truthfully, they are very cleverly designed and constructed. The application was to guide aircraft using primitive runways or just a meadow, and in some case, to guide damaged aircraft in for a night-time emergency landing. This was during the blackout days of Britain. Lets take it apart. First off, it has three feet, and three feet are self-stabilizing.
|
|
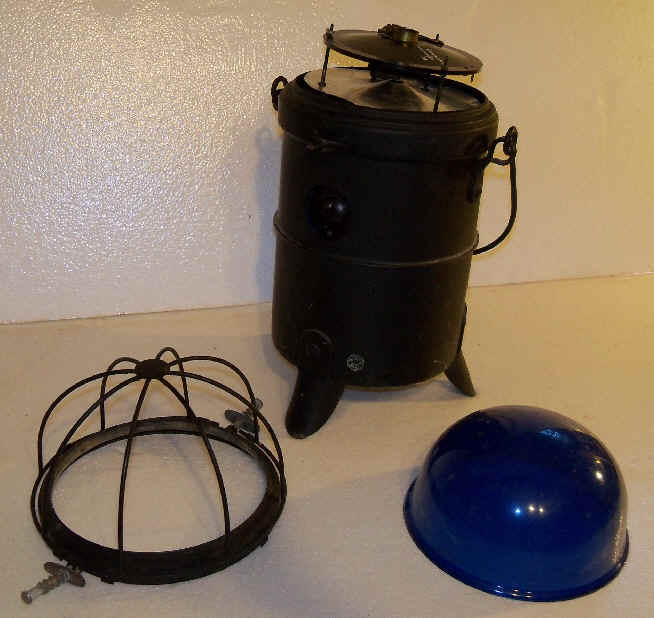 Image 8. Lens has been lifted off and the gimbal portion of the
light housing can be seen at top of can.
Image 8. Lens has been lifted off and the gimbal portion of the
light housing can be seen at top of can.
|
Gray knob on far right is solid steel and it is a counterbalance to the gimbal mechanism. This mechanism sits on the can rim with the lower part being the pendulum portion of the gimbal in the can. The intentions are that the light can be put on uneven ground and the internal parts of the light would align to local vertical so the light could not be seen from above.
|
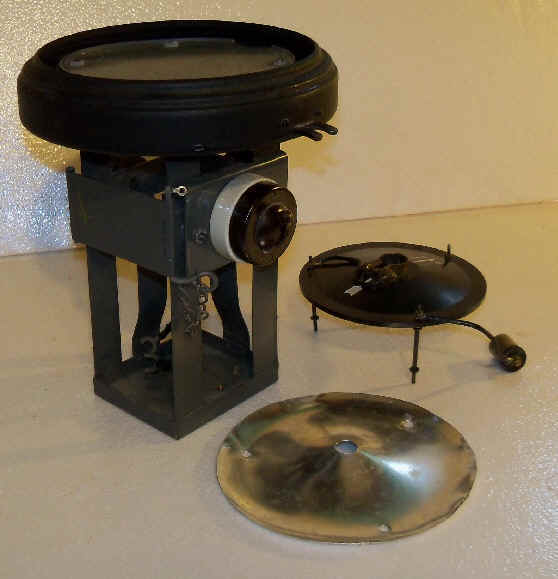 Image 11. In
this image the flat springs can be seen that holds the battery (not shown) in proper
position for balancing. The chain secures the battery door latch. Image 11. In
this image the flat springs can be seen that holds the battery (not shown) in proper
position for balancing. The chain secures the battery door latch.The glim light bulb socket with its wire is seen just below right of top lamp shield. The shaped reflecting plate (bottom) is secured to the three standoff screws on the lamp shield. The reflecting plate will rest on the flat surface of battery box.
|
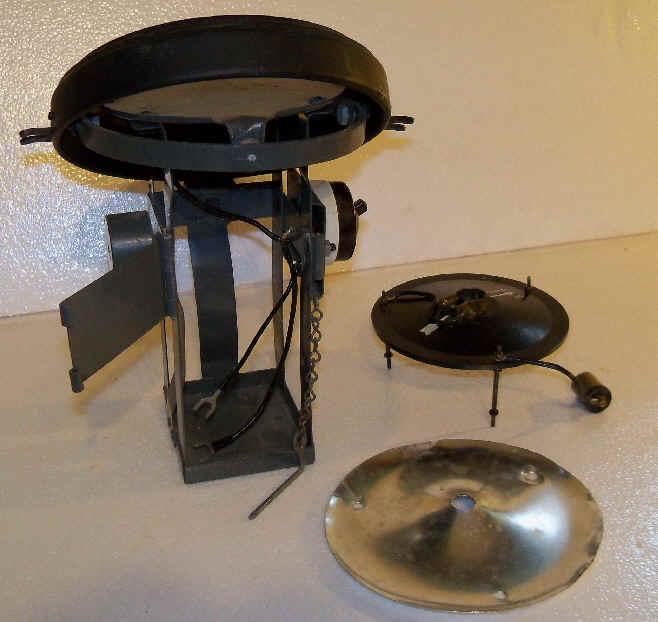 Image 12.
The battery door latch has been released and the securing pin remains attached to chain to
prevent its loss. Leads and connectors go to screw terminals on the battery. Image 12.
The battery door latch has been released and the securing pin remains attached to chain to
prevent its loss. Leads and connectors go to screw terminals on the battery.
|
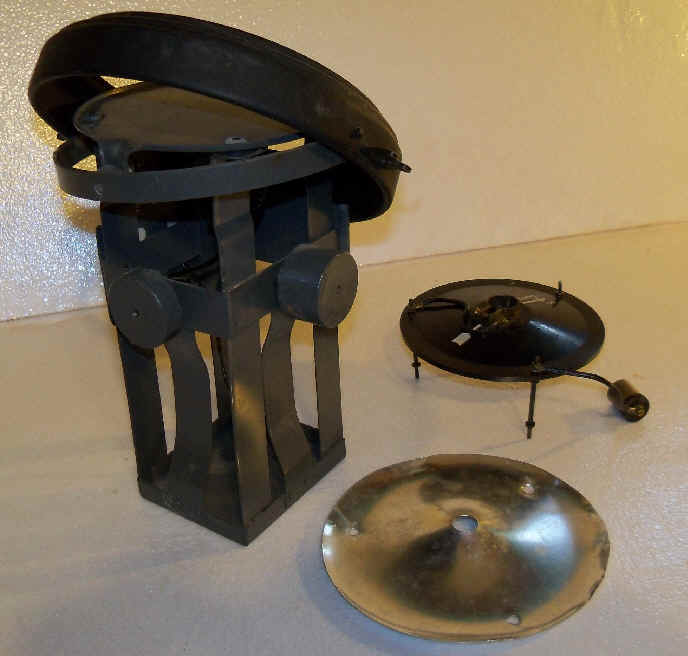 Image 13.
Both gimbal counterweights are seen here. Once lamp is on the ground, the light can
be seen horizontally and very slightly from above. This allows the pilot of an
approaching plane to see the lamp but few other pilots could. Image 13.
Both gimbal counterweights are seen here. Once lamp is on the ground, the light can
be seen horizontally and very slightly from above. This allows the pilot of an
approaching plane to see the lamp but few other pilots could.
|
The "windward" indicator will advise user for the position of the lamp so that the access hole to the power switch will be down wind and free of blowing mist and rain. The glim light is a 360-degree light.
|
In general, the design is extremely good, in that it is serviceable, simple, and reliable. There is a lot of machine work involved, but that would have been expected in that day. I would have thought there would have been a greater use of Bakelite, but I am sure they were very material-conscious.
|
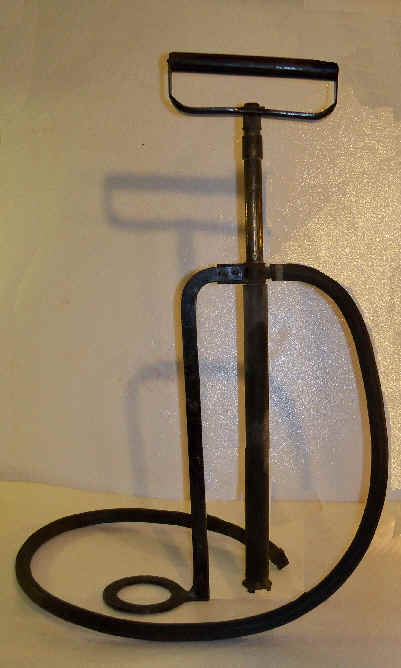 Image 16. And now (last) is the
ubiquitous, wonderful Stirrup Pump! These were very hard to find in the 1980s and
now are near impossible to locate. Image 16. And now (last) is the
ubiquitous, wonderful Stirrup Pump! These were very hard to find in the 1980s and
now are near impossible to locate.Like the gas mask in a cardboard box, these were everywhere in the war years in Britain. There were all sorts of regulations about the blackout and what the people could do to protect family and property. One was there was to be a bucket of sand in the house or on each story to help extinguish fires caused by bombing and naval shelling. And there was also to be a bucket of water. It seemed that these stirrup pumps were in nearly every house and/or on every story. These, too, are clever. I just wish they stood upright by themsleves! I tested mine when I got it and it does put out a healthy stream of water. It is simply a handle that can be used with two hands while the circular stirrup part is under foot on the floor beside the bucket. (Think of the old tire pumps.) Someone would be pointing the end of the rubber hose at the fire. The hose really is rubber and so remains flexible still. Clamped in the end of the hose is a square piece of metal with a small hole in it to increase the pressure and the distance the water could be projected. One of the reasons that these became so rare is that it wasn't needed after the war -- except by boat people. They made brilliant bilge pumps! I was told this by a British chap who had one on his boat and he said he didn't know of any of the smaller boats that didn't have one! On occasion, I will see one in an old movie. Sometimes just in the room and many times mounted to a sailboat. |
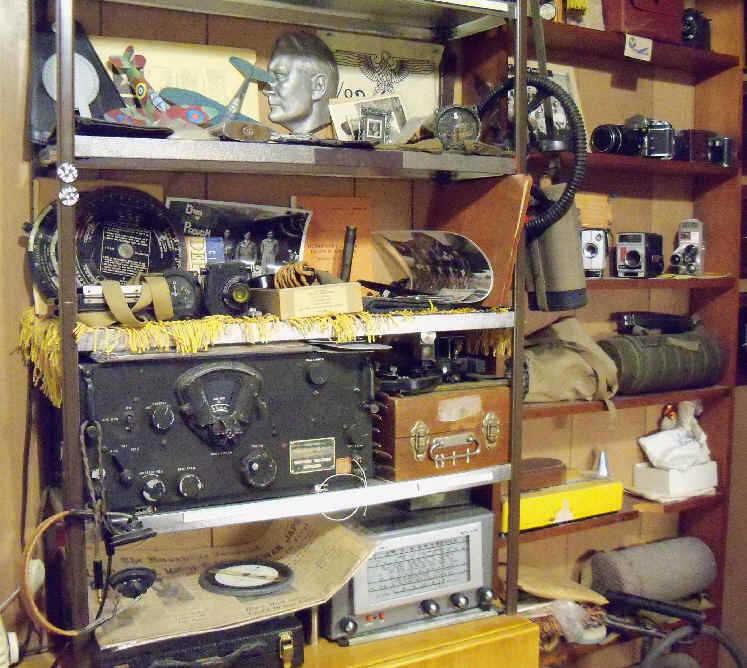
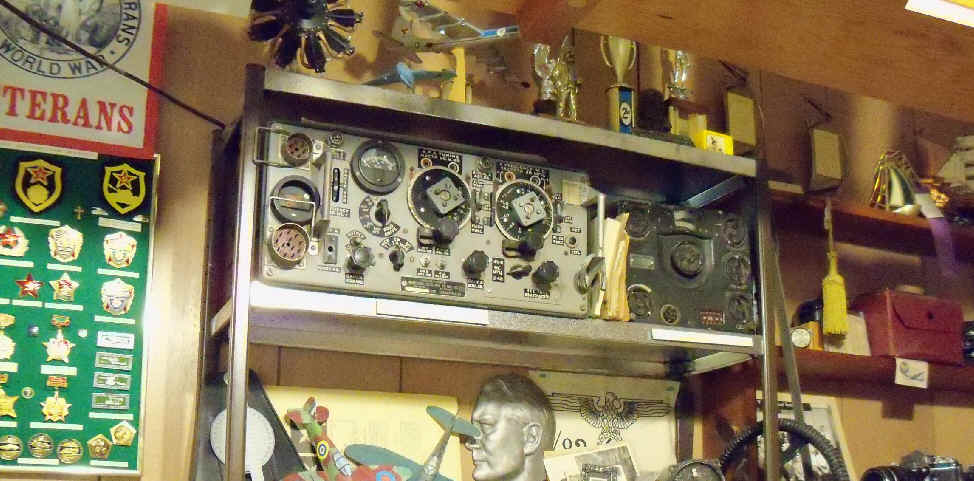
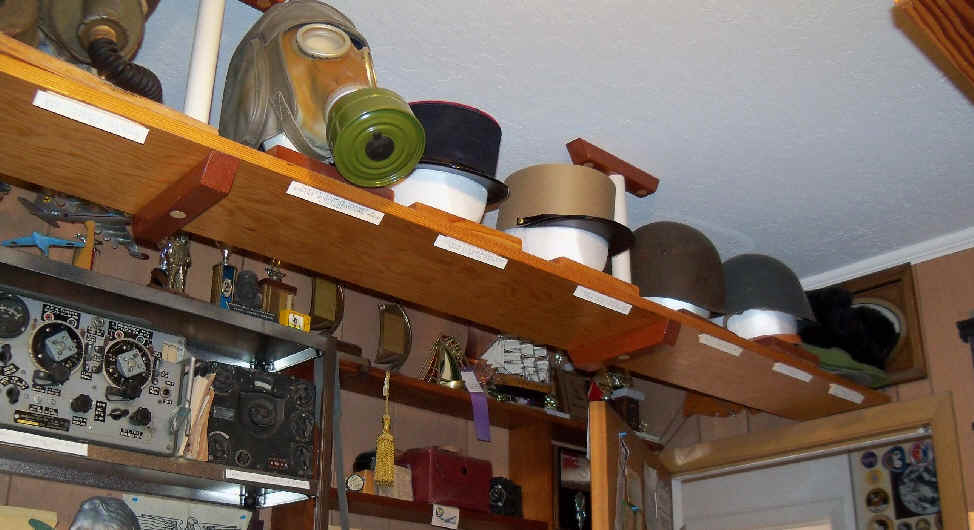
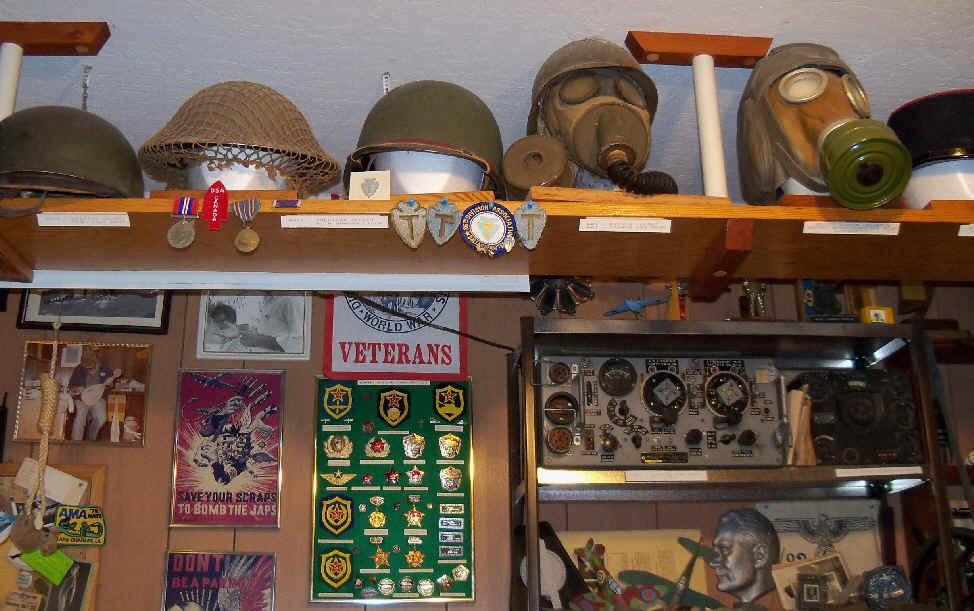

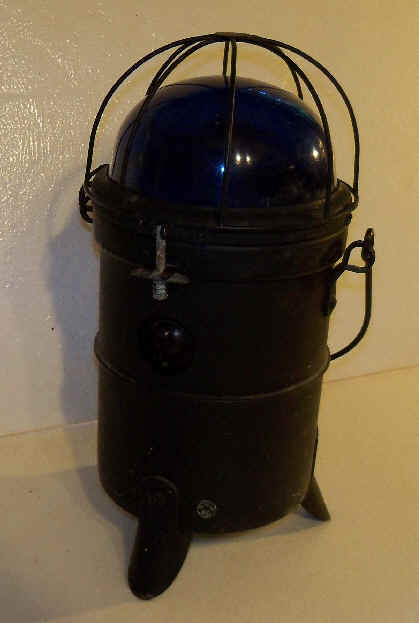 Image 7. A very unusual find! It is a WWII British
Glim light. and it is about 18" tall. Not much has been written about them but
like the stirrup pumps and cardboard box gas masks, they were at one time very numerous.
Image 7. A very unusual find! It is a WWII British
Glim light. and it is about 18" tall. Not much has been written about them but
like the stirrup pumps and cardboard box gas masks, they were at one time very numerous. Image
7. Here the wire lens guard has been unclipped by releasing some very strong
spring fasteners. Their strength is needed so the lens would be pressed into the
"O" ring it sits on; thus getting a rain seal so water would not run off lens
and into glim light.
Image
7. Here the wire lens guard has been unclipped by releasing some very strong
spring fasteners. Their strength is needed so the lens would be pressed into the
"O" ring it sits on; thus getting a rain seal so water would not run off lens
and into glim light. 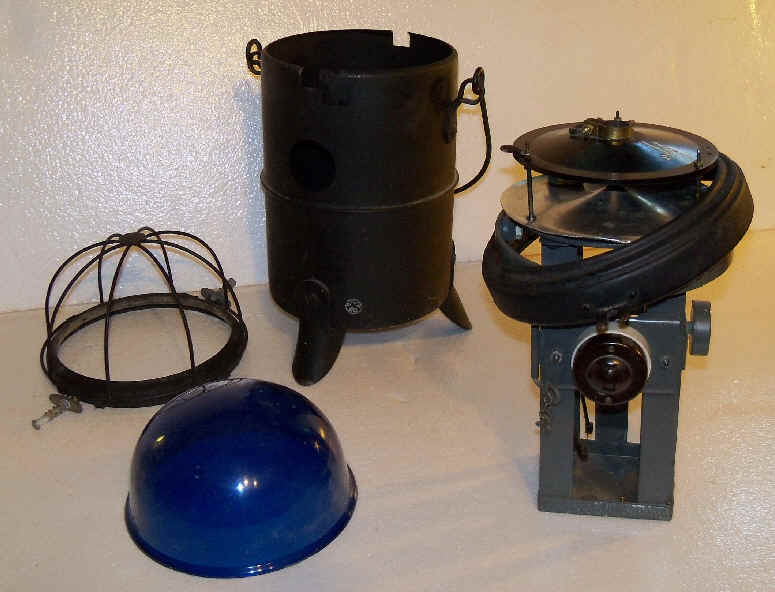 Image 10.
Here the gimbal mechanism has been lifted out, showing the switch for the lamp. This
switch can be reached through a small hole in the can to light the bulb. The bulb
would be mounted bulb down from top mount that is over disc reflector.
Image 10.
Here the gimbal mechanism has been lifted out, showing the switch for the lamp. This
switch can be reached through a small hole in the can to light the bulb. The bulb
would be mounted bulb down from top mount that is over disc reflector.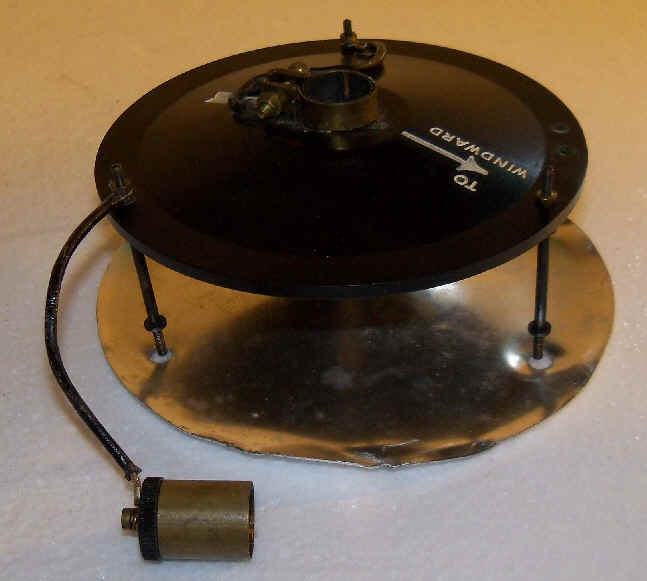 Image 14. Bulb socket has been
removed from center clamp and is laying lower left. This is process is necessary to
replace bulb.
Image 14. Bulb socket has been
removed from center clamp and is laying lower left. This is process is necessary to
replace bulb.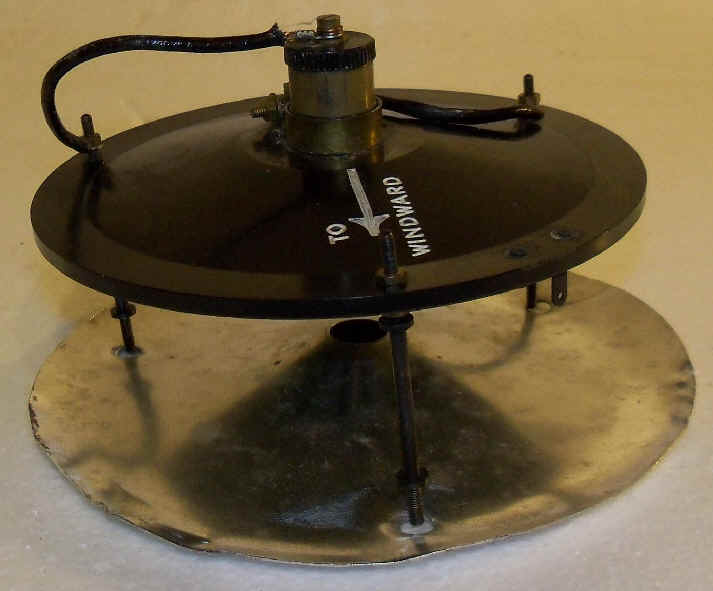 Image 15.
Bulb socket has been secured in the socket clamp. The bottom of the bulb would rest
on the center hole of the reflector plate.
Image 15.
Bulb socket has been secured in the socket clamp. The bottom of the bulb would rest
on the center hole of the reflector plate.